consul的入门
前言
Consul用的是Golang语言编写,所以很自然的实现了多平台运行的能力
Consul支持的功能有这些:
- 服务发现:服务提供者可以注册服务在上面,其他应用程序可以通过
Consul来访问[DNS, HTTP]这些服务 - 健康检查:
Consul可以提供任意数量的健康检查。运维可以清楚的看到这些服务的状况 - K/V存储:键值存储用于任何地方,包括配置中心,简单易用,使用
HTTP API即可 - Secure Service Communication
- Multi Datacenter
服务发现
pom.xml加入依赖(2.2.6.RELEASE和Hoxton.SR3):
<dependency>
    <groupId>org.springframework.cloud</groupId>
    <artifactId>spring-cloud-starter-consul-discovery</artifactId>
</dependency>
在bootstrap.yml文件里:
spring:
  application:
    name: product-service
  cloud:
    consul:
      host: 127.0.0.1
      port: 8500
在启动类上添加注解@EnableDiscoveryClient注解(不管是Eureka还是Nacos都是基于Spring的接口实现了服务注册的功能):
@SpringBootApplication
@EnableDiscoveryClient
public class ProductApplication {

    public static void main(String[] args) {
        SpringApplication.run(ProductApplication.class, args);
    }
}
很容易看懂这些配置,配好Consul的主机地址和端口就可以了,这时候启动就能看到注册到了Consul上面,如下图所示:

如果不需要注册中心,只是需要服务注册的话,可以把上面bootstrap.yml的内容写在application.yml里。这里涉及到的是配置文件加载顺序的问题。因为在加载配置之前,需要从注册中心先拉取下配置文件来,再去初始化其他服务,而bootstrap.yml里的配置是系统级的,会比其他自动配置早加载。
配置中心
配置中心有一些配置的描述很晦涩,这里拿出来特意说一下。
pom.xml加入依赖:
<dependency>
    <groupId>org.springframework.cloud</groupId>
    <artifactId>spring-cloud-starter-consul-config</artifactId>
</dependency>
在bootstrap.yml文件里:
spring:
  application:
    name: product-service
  profiles:
    active: dev
  cloud:
    consul:
      host: 127.0.0.1
      port: 8500
      # discovery下的都是多余的,因为默认都是true
      discovery:
        enabled: true
        register: true
        deregister: true
      config:
        enabled: true
        format: YAML
        prefix: config
        default-context: product-service
        profile-separator: '::'
        data-key: data
主要看config下的配置解释:
- format: 表示这个配置的值是一yml文件
- enabled: setting this value to “false” disables Consul Config
- prefix: sets the base folder for configuration values
- default-context: sets the folder name used by all applications
- profile-separator: sets the value of the separator used to separate the profile name in property sources with profiles
看完一脸懵逼,除了本身的英文水品不高外,没有示例的话完全看不懂啊喂
接下来请看示例:
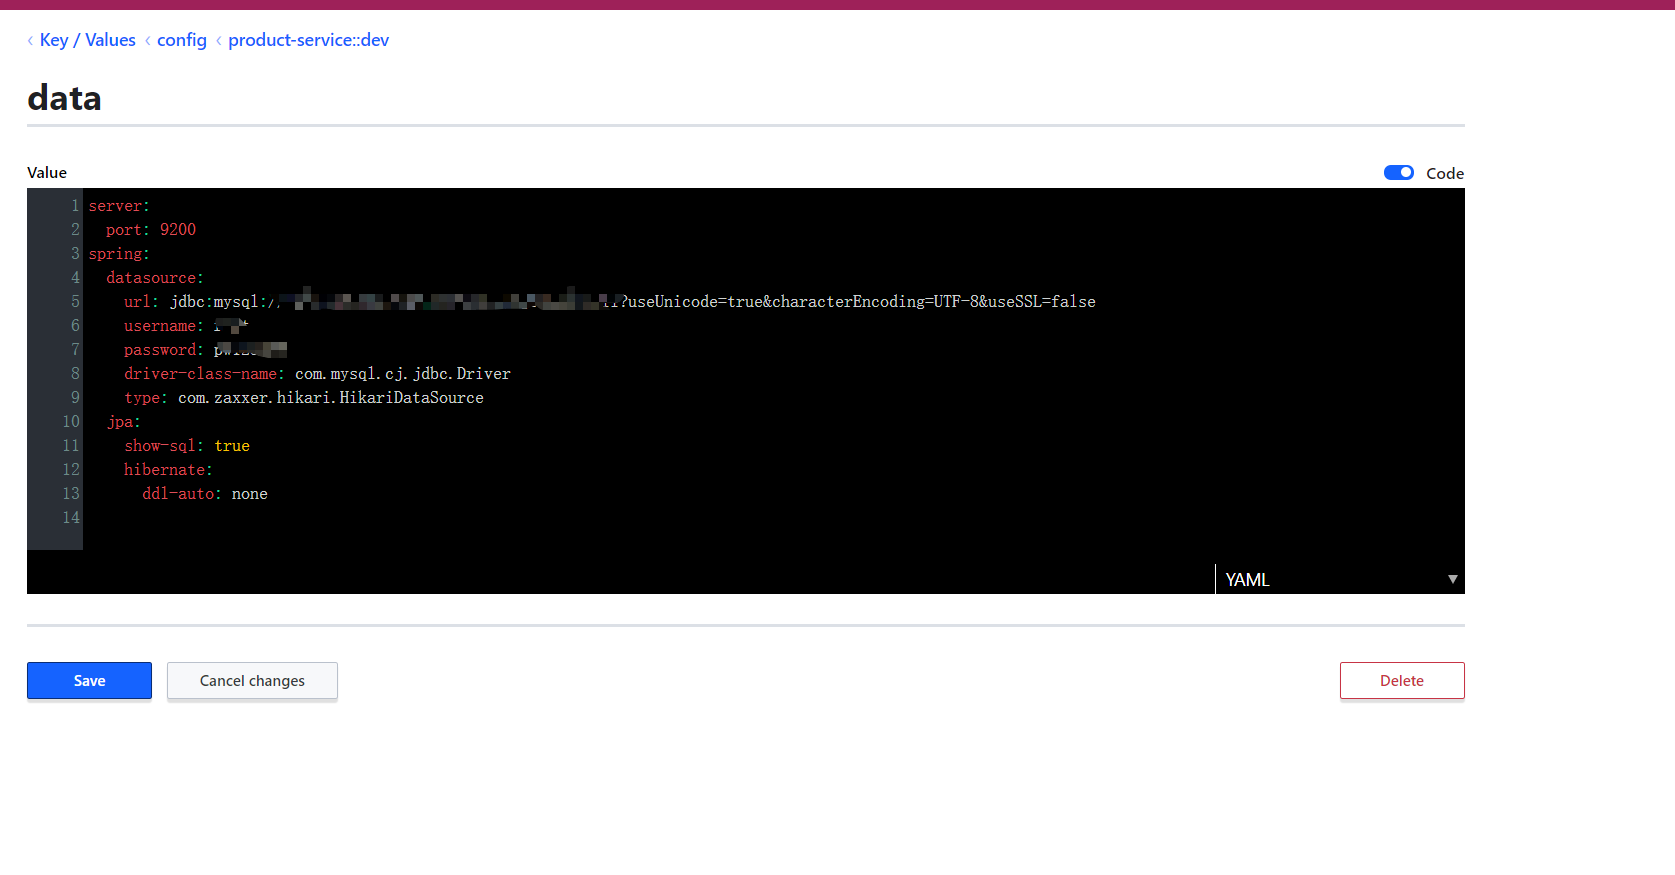
上图是我的一个配置,路径是config/product-service::dev/data,发现了什么吗?对的,配置的路径就是按照prefix + default-context + file-separator + spring.profiles.active + data-key组合而成的。
配置好后,启动项目,Spring就会先从Consul来拉取配置,然后再去配置其他的自动配置项
接下来看看自动刷新配置的功能,作为合格的配置中心,热修改配置是必须的能力,同样的是结合了Spring来实现的,只需要加入Spring的注解就好了,如下demo:
consul新加一个配置
config:
  data: test
然后在代码里加入@RefreshScope注解
实体类Config.java
@Data
@Component
@RefreshScope
@ConfigurationProperties("config")
public class Config {

    private String data;

}
启动类ProductApplication.java
@RestController
@SpringBootApplication
@EnableDiscoveryClient
@EnableConfigurationProperties
public class ProductApplication {

    public static void main(String[] args) {
        SpringApplication.run(ProductApplication.class, args);
    }

    @Autowired
    private Config config;

    @GetMapping("/example")
    public String getExample() {
        return config.toString();
    }

}
当访问http://127.0.0.1:9200/example时,可以访问到example配置的值,第一次访问是Config(data=test)
接下来保持这个状态,直接在Consul里修改配置
config:
  data: real
再次访问http://127.0.0.1:9200/example,发现返回的值是Config(data=real)
至此,配置中心的热加载也成功了
总结
之前学了SpringCloud Config和SpringCloud Bus,感觉Consul的操作要少很多,在实践起来也会好一点,不过不知道流行程度如何。总体来说是一个很不错的服务注册和配置中心(废话)。